Plate Form Heel Shoes Style Is Back

There are we will talk about the plate form heel style is in trend again. This is very stylish and trendy style of shoes with high or low heel but it is really very comfortable. It is really very easy to wear it even for the long time in any function or in duty timings too. According to the type of seasons you can find different type of shoes in this heel style from the market very easily. You also can find different colors according to your dress and demand too.

There are different styles and designs in the dresses and shoes are in trend in different timing and almost every new trend is become famous only because of its qualities and disqualifies. If the thing is good nice and more comfortable that it can be move in the market for long period other wise after sometime passes nobody will knows about it. BEAUTIFUL CHIFFON DRESSES FOR EID can be look more attractive and beautiful with these plate form stylish and trendy dresses.

Almost every one knows it very well that the ladies of almost all age groups are really like to do good and stylish dressing according to the demand of events and routines too. To look trendy and stylish they are looking for something new and stylish all the time and we can say easily that any fashion only can move or survive only because of these ladies. Now days the percentage of working ladies is increases day by day and all the companies are tries to make their accessories to give them more comfort with style and trendy look too.

Plate Form Heel Shoes Style Is Back

Plate Form Heel Shoes Style Is Back

Plate Form Heel Shoes Style Is BackPlate Form Heel Shoes Style Is Back
Plate Form Heel Shoes Style Is Back

Plate Form Heel Shoes Style Is BackPlate Form Heel Shoes Style Is Back
Plate Form Heel Shoes Style Is Back
Read more »

How Hijab Enhances Your Beauty

Hijab is the way to cover your hair and dead as per the instruction of God in the Holly Quran in different wording. It is also a way to protect your natural beauty by God. God loves you very much and don’t like to behaving with you like a show piece also wants to save you from the all men’s eyes. By following the instruction of God you can feel that like this you can save your selves to face the many problems. Problems can be social or physical too. It is also a way of protection your beauty naturally.

There are many style sand designs of scarves are available in the market you can choose any one as per your choose and also can wear it according to your comfortable. You should wear it while you are going out from your house and it can be possible that you have to spend much time with it so the material should be very comfortable and also according to the season.

There are also many styles to wear it, you can choose the easiest way to wear it you will feel that like this your hairs also protected from all type of pollutions and look stunning too. When you will use it regularly then you must be very comfortable with it. You also will feel very stylish and beautiful it can be the reason the increase in your beauty. In some Muslim countries even brides a wear this with their wedding dress and if you have a chance to see such a bride you will feel that she is looking more gorgeous with it.

How Hijab Enhances Your Beauty

How Hijab Enhances Your Beauty

How Hijab Enhances Your BeautyHow Hijab Enhances Your Beauty
How Hijab Enhances Your Beauty

How Hijab Enhances Your BeautyHow Hijab Enhances Your Beauty
How Hijab Enhances Your Beauty
Read more »

Styling Curly Hair

Curly hair is sometimes thought to be coarse and given to unruliness. While those with straight hair styles envy the curls, those who sport the corkscrew tresses forever wish for the flat, long styles. Those with long curly hair in particular seem to have their work cut out for them since so many hairstyles require a lot of work to just hold and keep in shape.

Tips for How to Style Naturally Curly Hair:
To be truthful, naturally curly hair is the kind of style that is not easy for everyone to accept and love. A short style may turn into a frizzy mess at the first sign of rain or elevated humidity in the air, while the mid length cuts seem to unravel halfway through the business day and before long the curly mess takes on the proportions of a bird’s nest. Fortunately, curly hair doesn’t have to be that complicated! There are a number of hairstyle ideas which will leave you pleased with your thick tresses.

What causes frizzy curls? Not even the best shampoo will undo the frizz if you perpetuate the one behavior that causes it: the blow dryer. To help get your hair ready for being shaped into the style you have chosen, the odds are good that using a hot air dryer is your preferred method of drying, but in so doing the hair is prevented to develop its natural curl. This of course makes your blonde mane incapable of following the layered look you have chosen.

Another heat source that has your curls see red is the straightening iron. For it to work properly the iron becomes very hot and thus temporarily relaxes the spiral but doing so comes at a cost: frizz. Short cuts will soon show signs of breakage that leave the hair looking frizzy while long cuts will not show the breakage as clearly but before long will present with split ends. Although straightened hair is the preferred condition for application of highlights and color, it is not advisable to overdo this procedure.

Two of the most commonly quoted tips revolve around the use of conditioning products instead of shampoo and continuing with the styling while the hair is still moist. How to style your curly hair depends on the cut; generally speaking, medium cuts may just need a running through with your fingers.

Those who have artificially curled hair will appreciate the advice to invest in a high quality leave in conditioner. Permed hair is notorious for its dryness and you will do well to augment any natural oils with a leave in product that is highly rated for its long duration of supplying nutrients and moisture to the hair.

Weaves and Permed Curls May Need Special Help
Styling and hair care advice for curly hair types desiring to weave in foreign tresses and sometimes artificial ornamentation requires them to remember that curls do not fall the same way each and every day. Start slowly with just one section woven in and see if you like the result before spending a day at the salon only to not be able to replicate the result the next day.

Source: Free Beauty Tips

Styling Curly Hair

Styling Curly Hair
Styling Curly Hair

Styling Curly HairStyling Curly Hair
Styling Curly Hair

Styling Curly HairStyling Curly Hair
Styling Curly Hair
Read more »

Do You Wash Your Face Properly

Washing your face every day is crucial, no matter your age or skin type. When you wash your face you remove any impurities, makeup residue and oil which if not removed may lead to some serious skin problems: clogged pores (blackheads), whiteheads, pimples, spots etc.
Nowadays there is a wide range of facial cleansers“ foams, gels, creams designed for every skin type from oily to hypersensitive. The cleansers gently clean the skin without irritating it, they remove all the impurities, dirt, oil, that have accumulated during the day or during the night, leaving the skin clean, tight and soft.

It’s essential to choose a cleanser that is appropriate for your skin type and for your skin’s needs. Those women with combination or oily skin should look for a stronger cleanser containing oil-absorbing ingredients; those with dry or sensitive skin should look for a milder formula with more nourishing and moisturizing ingredients.

It’s crucial to select skincare products that are oil-free (don’t contain oil), non-comedogenic (won’t clog pores), hypoallergenic (won’t irritate the skin) and non-acnegenic (won’t cause acne). Today most of the facial cleansers contain many active ingredients: alpha hydroxy acids, salicylic acid, glycolic acid, essential oil, vitamins, minerals, glycerin, collagen, elastin, sodium laureth sulfate.

You should wash your face at least twice a day (in the morning and in the evening) in order to keep your skin clear and flawless.

HOW TO WASH YOUR FACE PROPERLY

Step One. Wash your hands
Wash your hands every time before cleansing your face, applying makeup or touching your face. If your hands are dirty you may rub bacteria or dirt onto your skin. Use an antibacterial soap and gently wash your hands with lukewarm water.

Step Two. Tie your hair
Tie your hair. This way it will be more comfortable for you when you wash your face.

Step Three. Remove your makeup
Remove your makeup with a mild makeup remover. Although facial cleansers remove all kind of makeup effectively you had better remove it prior to washing your face. Choose a mild makeup remover that suits your skin type and first remove the eye makeup.

Step Four. Wet your face
Splash your face with lukewarm water to prepare your skin for the cleanser and to open your pores for a deeper cleansing.

Step Five. Apply the cleanser
Place a small amount (a dime-size) of the cleansing product on your palm or to a washcloth.
Using your fingertips or a brush gently rub the cleanser all over your face. Make sure you cover all areas: chin, forehead, nose, cheeks, neck. Massage your face with gentle circular motions for a minute. Remember: never remove the cleanser immediately after you apply it – let it penetrate your skin for a dew minutes (it usually takes one/ two minutes).

Step Six. Rinse your face
Rinse your face to remove the cleanser. Splash your face with water several times until you feel that the cleanser has rinsed off completely. You can use a face sponge, a muslin cloth or cotton pads to remove the cleansing product.

Step Seven. Splash your face with cold water
Rinse your face with cold water to close the open pores and to improve your blood circulation.

Step Eight. Gently blot your face
Pat your face with a clean towel.

Step Nine. Tone your skin.
If your skin is oily or combination it’s crucial to use a facial toner. The toners remove any traces of makeup, dirt and oil that your cleanser may have missed. They also reduce pores, eliminate oil and refine the skin. What they do in addition to making your skin feel tighter, is prepare the skin for the moisturizer.

Step Ten. Moisturize your skin
Apply a moisturizer or a hydrating face cream every time after washing your face to moisturize your face. Again make sure the moisturizer is appropriate for your skin type.

Useful Beauty Tips:

Washing your face twice a day is a must in order to keep your skin clear.
Never use bar soaps to wash your face as they tend to dry out the skin.
Never wash your face with hot or too cold water – you may irritate your skin.
Never over-cleanse your skin.

Avoid cleansing products containing alcohol or any harsh chemicals.
Always remove your makeup before you wash your face.
Remember: hot water can strip your skin of its natural oils, leaving it dry and irritated.
Always apply the cleansing products to a wet face.
Always make sure you have removed all traces of the cleanser, otherwise it can irritate your skin.

Never rub your skin.
Always make sure the cleansing product is appropriate for your skin type.
Wash your face at least twice a day.
Always apply moisturizer after washing your face.
Don’t forget to exfoliate your skin once or twice a week with a mild exfoliator to remove the dead skin cells.

It’s best to wash your face with lukewarm water rather than with hot or cold water.
Avoid using strong or harsh cleansers and toners.
Cream based cleansers are appropriate for the winter months as they moisturize the skin.
If your skin is sensitive choose a fragrance-free cleanser.
f your skin is oily look for a water-based cleanser in gel or foam formula.
If your skin is dry look for a cream cleanser that moisturizes your skin.

Source: Beauty Advice

Do You Wash Your Face Properly

Do You Wash Your Face Properly

Do You Wash Your Face ProperlyDo You Wash Your Face Properly
Do You Wash Your Face Properly

Do You Wash Your Face ProperlyDo You Wash Your Face Properly
Do You Wash Your Face Properly
Read more »

Remove Winter Dry Skin Patches

Patches of dry, flaky and itchy skin are common during the fall and winter months. While they can appear on almost any part of the body there are typically common on the legs, face, and hands. While there are many skin conditions that cause dry patches such as eczema, psoriasis, and fungal infections, this article will deal with dry skin patches due to environmental factors, such as cold weather and low humidity and the lack of hydration to the skin.

Below are some simple steps to help you treat dry skin patches:

1) Limit the time you spend in the bath or shower. If you like extremely hot showers, adjust your water temperature down. Showers and baths strip the body of its natural oils thus causing the skin to become overly dry.
2) Apply an emollient rich cream on dry patches while skin is still damp. Continue to apply cream frequently throughout the day. I have used Eucerin and I also find that body butters work great too. Other options are Vitamin E and oils such as olive oil, avocado oil, tea tree oil, grape seed oil, etc. where a little dab will work wonders
3) Evaluate your soap. There are varieties on the market that can provide moisturizing ingredients. If you use a deodorant soap use only in areas that need it, underarms, etc. These types of soap are harsh and very drying. Better yet consider making some homemade soap rich in essential oils that offer so many benefits to the skin. They also make great Christmas presents too!
4) Exfoliation is recommended for dry patches if the area is not inflamed or has broken skin. Exfoliates will slough off the dead skin on top thus allowing your moisturizer into the lower layers of the skin.
5) Hydrate from the inside! Drinking water is vital to good health and good skin. Most people do not realize the importance water plays in their overall health.
6) Diet – unfortunately fresh fruits and vegetables are scarce in the northern climates, however try to follow a diet that is rich in Vitamin E, A, C, essential minerals and omega-3 fatty acids or consider vitamins and supplements.

From Bukisa

Remove Winter Dry Skin Patches

Remove Winter Dry Skin Patches

Remove Winter Dry Skin PatchesRemove Winter Dry Skin Patches
Remove Winter Dry Skin Patches

Remove Winter Dry Skin PatchesRemove Winter Dry Skin Patches
Remove Winter Dry Skin Patches
Read more »

Dry Skin Patches Remedies

1 drop tea tree oil
1/2 teaspoon almond oil
Rub into dry patch. Great for those small dry patches!
Another option is to add tea tree oil right into your moisturizer.

Aloe Vera gel has wonderful properties thus it is widely used in skin care products. Apply directly to the dry patch. Be sure to purchase 100% aloe Vera gel or better yet grow you own plant.

Soak a washcloth in milk and lay on dry skin patch for five minutes. This is soothing if the dry skin patch is itchy too. The lactic acid in milk is well know for its hydrating properties and a gentle alpha hydroxyl acid exfoliate.

From Bukisa

Dry Skin Patches Remedies

Dry Skin Patches Remedies

Dry Skin Patches RemediesDry Skin Patches Remedies
Dry Skin Patches Remedies

Dry Skin Patches RemediesDry Skin Patches Remedies
Dry Skin Patches Remedies
Read more »

Plucking Your Eyebrows

Tweezing your eyebrows is the most dramatic way to change your face without makeup or surgery. It can make your eyes look larger and give your face a clean, polished look.

Steps:
1. Sit near a window to get the best light.

2. Wash the area thoroughly so it’s not oily.

3. Decide what shape you want for your eyebrows.

Styles change: It may help to flip through fashion magazines for ideas.

4. Draw in a brow line on your eyebrow with a brow pencil to serve as
a guide. Follow the brow’s natural line by conforming to the curve of your upper eyelid.

5. Pull the skin at the outer end of the eyebrow taut against the brow bone, and use the brow bone as an additional guide.

6. Use a pair of angled eyebrow tweezers to pluck the hairs below the brow; never shape your brow by plucking above it. Pluck only one hair at a time.

7. Start plucking in the middle of the eyebrow and pluck toward the outer end; then go back to the middle and pluck toward the nose.

Your brows should extend a little beyond each corner of your eye.

8. Use a cotton ball or pad soaked in pure tea tree oil or witch hazel to soothe your plucked brows.

Tips:
Consider having your brows waxed once professionally to get exactly the shape you want. You can then pluck the strays as they grow in.

Habitual plucking may make some hairs stop growing permanently, so pluck with caution.

There are tweezers on the market that are specially designed for plucking eyebrows. They cost a bit more but make the experience less painful.

Eyebrow Tweezing:
Always grasp the hair as close to the root as possible. The further away from the root you grasp, the more it hurts. Hold the skin down and pull slowly in the opposite direction to the tweezers. This also reduces pain, as well as the risk of ingrown hairs. If you yank the tip of the hair with the tweezers without supporting the skin, you risk snapping the hair just below the skins surface. This is one of the causes of ingrown hair. Exfoliate the skin regularly with a gentle exfoliant, it helps prevent ingrown hairs also. Be sure both skin and hair are dried before tweezing (skin is more sensitive when it is wet). A heat pad is ideal to prepare
the skin. Failing that, use a hot flannel and dry off before tweezing.

The beauty of Threading:
Threading is much easier than waxing. When you wax, you run the risk of pulling out wanted hairs. Tweezing is painful, as you’re pulling out each hair one by one. The best thing to do is thread. Go to a salon – - threading is not for amateurs. No product is being used on your skin (such as wax). You can pluck the hairs as they grow in. I advise you to put an ointment on after threading, as some people experience redness. Be aware of the ‘green shadow’ that may come from waxing/threading/tweezing. When the hair grows back in its place, it leaves a green shadow. I find threading to be the best way to remove it!

So it’s OK if your hair grows in for a week or two – - you can remove the shadow all at once!

Plucking Your Eyebrows

Plucking Your Eyebrows

Plucking Your EyebrowsPlucking Your Eyebrows
Plucking Your Eyebrows

Plucking Your EyebrowsPlucking Your Eyebrows
Plucking Your Eyebrows
Read more »

Smokey eyes have been a big style for quite awhile and there's no sign this particular trend is dying. Here we show you step-by-step instructions on how to get the perfect Smokey eyes.

The key to the perfect Smokey eyes is proper blending. You want to make sure colors are blended together flawlessly. Also, it's important to pair light base colors with rich dark colors. Nice mixes include: Soft gold base with deep purple on top, champagne base with bright blue and peach base with green hue.

Prep the lid. The key to keeping eyeshadow from melting into your eyelid crease as the day goes on is to kept eyelids oil-free. To do this start with an eyeshadow base (also called "primer"). Simply swipe the primer across the eye and let it dry before you continue to the next step.

Some great primers for a smokey eye include MAC's 'paint' and Urban Decay's 'Primer Potion'.
Apply eyeliner. If you're going for a typical black, brown or gray smoky eye, apply liner in one of those colors above the upper lash line, drawing line thicker in the middle of eye. If you're opting for a jewel-toned eye (violet makes a gorgeous smokey eye), line eyes with a purple, blue or deep green liner.

Tips:
Remember to keep lips nude. When applying strong makeup (like smokey eyes or red lips) put the focus on either eyes or lips, never both. (Think Angelina Jolie: She either plays up her huge eyes or her huge lips, never both. If she did, she'd look like a clown).
For a bit of fun, try a blue or purple mascara. It will make blue eyes "pop."
Liner doesn't have to come in pencil form. Makeup experts know eyeshadows make some of the best eyeliners. To do this take an eyeliner brush (available at Sephora, MAC or any dept store), wet it, then dab wet brush into the dark shadow. This allows for a deep, precise line. You can also use the dark shadows without wetting brush first. Either way, eyeliner is necessary for smoky eye.

What You Need:
1)Eye primer (you don't need it, but it's great for keeping shadow in place)
2) Shadows: One light, one darker
3)Eyeliner
4)Makeup brushes
5)Mascara

How To Get Smokey Eyes

How To Get Smokey Eyes

How To Get Smokey EyesHow To Get Smokey Eyes
How To Get Smokey Eyes

How To Get Smokey EyesHow To Get Smokey Eyes
How To Get Smokey Eyes
Read more »

Why to Use a Fabulous Blush On

Are you the type of person who has been unblessed to have a skin tone that looks pale or perhaps lifeless? Put an end to having a look that! You don’t have to be unattractive because there are real solutions that can help you improve your complexion without spending too much.

Are you the type of person who has been unblessed to have a skin tone that looks pale or perhaps lifeless? Put an end to having a look that! You don’t have to be unattractive because there are real solutions that can help you improve your complexion without spending too much. Put a little color on your skin by making use of some sort of cheek blusher directly on the apples of your face. Just make sure to apply the blush after the base which is normally a foundation (liquid, cake or powder). Following the makeup foundation application, start using a few dab of blush-on to the apples of your face so as to add color as well as contour.
Listed below are some benefits associated with using blush-on as well as the reason why you might want to always be making time for it.

• Blush-on application is amazingly effortless. You actually don’t really need to be an experienced person only just to be able to make use of a simple yet effective blusher on your own face. Most people just simply need to decide on the type of blusher that you would like to put directly on your own face. Pat the actual brush on the blusher and spread the contents around the apples of your face. Take a moment to blend it well with the contours of your cheeks, the foundation that you have used, as well as the other makeup that you have used like your eye shadow, face powder and lipstick. These are just basic, but in actual, you’ll have to deal with a lot. But just for an everyday look, make sure that the ones mentioned are blended well together in order to create a nice harmony of colors on your face, and make it look as natural as it can be.
• A great deal of shades and tones are available in the market today. The usual shades of blush-on are pink, orange and bronze. It is most beneficial that you understand your skin tone in order to choose the best color or shade of blusher to wear. Don’t wear blusher that is too bright. Just choose the color that is natural looking. You will definitely find the right shade for you with a wide range of shades to choose from.

• It adds color to your face. You will not be looking like dead anymore with your pale skin. You just have to apply the blusher evenly on your face to create a natural blush on your face. It will give your color to your face. Applying foundation and lipstick is no enough to look good. The middle portion of your face looks pale without the blusher on.

Here are some benefits of blush-on. Remember that it is always a part of the beauty regimen that women have. If you want to look glowing, blush-on is simply what you need.

Why to Use a Fabulous Blush On

Why to Use a Fabulous Blush On

Why to Use a Fabulous Blush OnWhy to Use a Fabulous Blush On
Why to Use a Fabulous Blush On

Why to Use a Fabulous Blush OnWhy to Use a Fabulous Blush On
Why to Use a Fabulous Blush On
Read more »

Match Nail Color To Your Skin Tone

Many things can influence your choice of nail color: the seasons, trends and your mood. Some say that lipstick shades that look great on your lips will also be the right color for your fingernails. That method, however, doesn’t work for colors like neon greens, yellows and blues!

More often nail color is matched to clothing. Actually the colors you wear and look good in have a lot to do with skin tone, so it makes sense that another way to tell which nail colors are right for you is by discovering what colors complement your complexion.

You might find that one shade of blue looks great on you, yet another is terrible. Or you’ll notice that a vibrant pink looks great on someone who appears to have the same complexion as you, but on you the same color looks drab. The type of pink you can wear depends on your skin tone. It can also be determined by whether the polish itself has a yellow or blue base.

Ethnic skin is typically lumped into warm or neutral-based categories, but depending upon racial background, some ethnic women have cool undertones as well.

So how do you know what undertones your skin has? Stand in natural light, either outside or by a window and look at your arm. Skin with pink, blue or red undertones is considered cool. Skin with golden, beige, or olive is considered warm. If you still can’t tell, look at your wrist. If your veins look blue, you have a cool undertone. If your veins look green, you have a warm undertone. If you still can’t determine your undertone, you might be neutral and you’re lucky because you can wear most colors.

Pale Complexions
Pale skin tones are considered a cool skin type. Lighter shades with pink or blue undertones are best. Pastel colors look great. Choose pinks or reds to brighten the complexion. Choose blue-based reds. If you’re pale with a warm tone, you can even try coral reds. If you’re very light, you want to avoid extremely dark or overpowering shades because these will make you look too pale. If you do wear a dark color like black, you’ll probably want to trim your nails to a shorter length.

Polish tip: Choose a polish with a blue base.
Shades that flatter: Pale: pastel pinks, blues and greens, pale peach, beige.
Shades to avoid: Dark polishes like dark blue or black (unless you happen to like the Goth or vamp look), yellow, green, gold and orange.

Fair Complexions
Fair, with a warm tone, you tend to have more of a variety of shades to choose from. Cool and warm tones can wear red, but cool undertones look better in blue-based reds. Warm (golden or peachy) tones look better in red polish with yellow/orange undertones.

Polish tip: Choose a polish with a blue base or yellow base, based on undertones.
Shades that flatter: Beige, white and silver. (French manicures look great), light and medium toned purples, soft oranges, darker pinks, reds and berry shades.
Shades to avoid: Very dark blue, black, green, dark orange, gold.

Tan Complexions
Tanned skin looks better in warmer colors. Lighter shades can accentuate tanned skin, like warm pale shades of brown, light blues, pinks and purples. Avoid gold, which will just blend with your skin color.

Polish tip: Blue and (possibly) yellow base.
Shades that flatter: Light blues, pinks and purples, tangerine, light brown, copper brown and chocolate.
Shades to avoid: Gold and shades of gold (because it will blend in with the tanned skin and lose vibrancy).

Medium/Olive Complexions

Medium skin tones enjoy a wide range of colors. You look good in dark burgundy and wines, vibrant colors like pink, blue, yellow and orange. Silver and metallics (like metallic blue). Medium-dark can wear black, navy blue, dark pinks, burgundy. Olive skin has a combination of yellow undertone and greenish hue. It looks slightly beige with yellow undertones. Peach or gold colors enhance olive complexions. Blue-based reds and orange-reds should be avoided. Olive-dark tones look great in earthy tones and chocolate browns with red undertones. Some reds, russet for example, work well, and gold.

Shades that flatter: Olive: peach or gold colors. Olive-medium: brown, reddish-browns, gold.
Polish tip: Blue or yellow base.

Medium-dark:

Shades that flatter: Vibrant orange, pink and blue, light blue, lilac, silver, metallic and glittery colors.
Shades to avoid: Dark purple, red or navy blue. Bronze colors won’t show well against your skin tone. Medium-dark: avoid paler, pastel shades, which could appear washed out.

Dark Complexions
Dark complexions can wear rich, deep shades, except dark brown, which will disappear. What looks great are burgundy, vibrant purples, plums, Bright orange and pinks zap the color out of rich dark tones. Neon yellow, orange and green can be shocking—in a negative sense. Though darker shades are better, very dark tones need to be careful with deep purples, grays and black, because these shades could make the skin appear muddy and dull.

Polish tip: Yellow or brown-based undertones.
Shades that flatter: Deep purples, dark, yellow-based reds, dark greens, dark blues, black, chocolate-brown and gold.
Shades to avoid: Orange, yellow, neon colors, pastels, white and silver.

If you’re not sure about how a nail color will look on you, the best way to decide whether you like it is to test it out on a fingernail. You can’t judge from the color in a bottle because achieving the color can be based on how many coats of the lacquer are applied. You could also love a color on your toenails, but be totally unimpressed when it’s applied to your fingernails. OPI.com has a great Try It On feature that lets you see how nail shades look on different skin tones.

So this is a general guideline. It’s not set in stone. Trust your gut and your eyes. You’ll know which shades look best on you.

Match Nail Color To Your Skin Tone
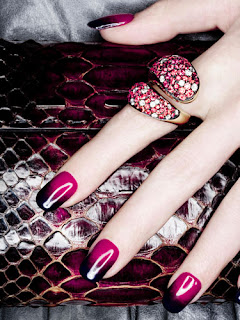
Match Nail Color To Your Skin Tone

Match Nail Color To Your Skin ToneMatch Nail Color To Your Skin Tone
Match Nail Color To Your Skin Tone

Match Nail Color To Your Skin ToneMatch Nail Color To Your Skin Tone
Match Nail Color To Your Skin Tone
Read more »