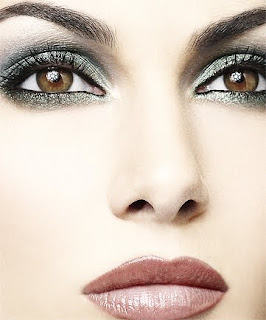
Smokey Eyes

The smokey eyes look is hot, hot, hot! But how do you get the look of smokey eyes? This dramatic look is not as difficult to achieve as a person might think. Smokey eyes should be the emphasis of a look, so the color of the rest of your facial makeup needs to take a backseat to the look of your dramatic smokey eyes.

First, apply your foundation the way you would usually. Every great makeup look starts with the right base foundation.If you need to cover dark circles or blemishes, do so before applying your eye makeup for a smooth basis for your eye color. Gently pat concealer on dark spots under your eyes. Then use your foundation to smooth the look of your skin. Finally, use a similar color of powder to set your foundation. Next, begin to create the midnight smokey eyes need for that dramatic look you desire. Choose a sheer color like silver or light gray for the base color of your smokey eyes look. Use this sheer color from the eyelash area all the way up to the bone under your eyebrow. Smooth this sheer color evenly onto both eyes, and make sure the color is distributed evenly on both eyelids.Take a medium gray and start applying it at the eyelid, blending the medium color to just above the eye crease of both eyes.

Applying the medium gray color with a clean brush instead a sponge applicator may give you more blending control while you apply this medium shade of gray. Check to make sure the medium color is even on both eyelids before continuing to the next step of the smokey eyes look.Use a dark gray shade of eyeshadow for the next step of creating the smokey eyes look. This deeper color is intended to give a dramatically dark look to the eye, so applying this shadow carefully is important. Using a brush or eyeshadow sponge, place the darkest gray on the eyelid from the lash area to the eyelids only, avoiding the crease area.If you apply the darkest color in the crease of the eye, it will end up spreading to other areas of the eye and ruin the shading of your smokey eyes shadow.

Make sure the dark gray has been applied evenly to both eyes, and blend hard lines if they form. Smokey eyes should blend gradually from the darkest color next to the eyelids up to the lightest color on the eye bones.Next take a small brush or applicator and put a smudge line of the darkest shadow color under the bottom eyelashes. Apply the bottom line of shadow smoothly and evenly.Apply two coats of gray or black mascara for lash length and volume. A thin line of eyeliner can also be applied close to the eyelashes, but it isn’t necessary.
To accent the drama of smokey eyes, use color in other areas of the face sparingly. Keep the focus on the eyes.

Smokey Eyes

Smokey Eyes
Smokey Eyes

Smokey EyesSmokey Eyes
Smokey Eyes

Smokey EyesSmokey Eyes
Smokey Eyes
Read more »

How To Get Rid Of Eye Wrinkles

The eye area is one of the first regions of the face to show the signs of ageing. The skin around the eyes is deprived of oil glands and is very delicate and that’s why the skin doesn’t have a protection against the environments influences and UV rays. Eye wrinkles / crow’s feet / are a common and highly visible sign of ageing.

The lack of oil glands makes the skin around the eyes prone to dehydration and makes it easier for the wrinkles to form. Unfortunately many women forget to use special eye creams and the result isn’t behind.

The hot sun during the summer and the bitter cold weather during the winter defeat the skin. The tiny lines around the eyes usually appear when we reach our late twenties. These lines gradually deepen over the years and become prominent, because the skin is the thinnest and most delicate in the entire body. The eyelid area is one of the most animated parts of the face with strong muscles creating multiple expressions.The most common cause of wrinkles around the eyes is the tiny muscles next to our eyes, contracting as we change our facial expressions, but that doesn’t mean that we should stop smiling.

The loss of elasticity also causes the formation of wrinkles. As we get older our skin loses its elasticity and produce less collagen under the skin. All of this makes the skin sag and wrinkle.The sun is also to blame. The sum damages the collagen fibres and causes the accumulation of abnormal elastin. The ultraviolet radiation (UV) causes wrinkles by breaking down the collagen and decreasing the skin’s elasticity and is associated with the formation of sun spots and other types of sun damage.

Smoking also helps the skin around the eyes to wrinkle easily, because it causes narrowing of the blood vessels in the layers of the skin. Smoking damages the elastin and collagen that help to keep the skin soft, tight and elastic. Smokers tend to have more wrinkles around the eyes than the non-smokers. Smoking also increases the wrinkles around the mouth because smokers squint more.

What you should do to prevent wrinkles around the eyes?
* Don’t forget to cleanse the skin around the eyes in the morning with special eye lotions or cleansing milk.
* Apply an eye cream with light pats but don’t stretch the skin. Apply them carefully starting at the outer corner of the eyes to the inner corners.
* At night remove the makeup carefully. Apply cleansing milk and remove the mascara firstly and when you have removed the makeup completely apply an eye cream again.
* The skin around the eyes is very delicate and sensitive, and that’s why you should use special eye creams or gels that are specifically made for the delicate eye area. Most of them contain ingredients that relax the muscles, vitamins, retinol and collagen.

Tips for treating wrinkles
* The eye cream should be applied before the face cream.
* Apply an eye mask twice a week.
* Place tea-bags over the eyes to calm irritates eyes.
* If your skin is sensitive use fragrance-free products.
* Always apply sunscreen, especially during the summer months.
* Avoid using creamy eye shadows- they may seep into your fine lines and accentuate them even more.
* Get plenty of sleep.
* Drink lots of water, at least 1.5 liter
* Wear hats and black sunglasses especially during the summerAvoid smoking – it makes you squint and deprive your skin from “air”
* Take vitamins and eat lots of vegetables and fruits
* Always use products of high quality.

How To Get Rid Of Eye Wrinkles

How To Get Rid Of Eye Wrinkles

How To Get Rid Of Eye WrinklesHow To Get Rid Of Eye Wrinkles
How To Get Rid Of Eye Wrinkles

How To Get Rid Of Eye WrinklesHow To Get Rid Of Eye Wrinkles
How To Get Rid Of Eye Wrinkles
Read more »

Choosing And Applying The Right Shades On EyeShadows

As we all know, the eyes are the most important and noticeable point of the face, the eyes makeup techniques and the choice of colors for eyeshadows have to suit to the shape and the color of your skin and most importantly of your eyes’ shape and color. If you apply the eye shadows correctly you can make your eyes look smaller, bigger, set apart or set closely together. The right shades of shadows emphasize the eyes and co-ordinate the color of the makeup with clothing. Eye shadows come in different types, textures and shades. There are liquid eyeshadows, eye shadow pencil, cream shadows, loose and pressed powder eye shadows.
Liquid eyeshadows are easy-to-apply. They add shimmering to your eyes and can serve as a base to help other eye shadows layered on them to set. The liquid eye shadows produce a translucent wash of color.Powder eyeshadows come in single or color coordinated sets. They accentuate the eyes and must be applied with a brush. The powder eyeshadows are available as loose powder or pressed powder. Sometimes small particles of gold leaf, bronze or silver are included to produce a metallic effect. They blend well, wear well and come in more colors.Cream eyeshadows – they are harder to apply and often collect in the eyelids crease during the day. Cream shadows must be applied with fingers or with a makeup sponge. Never apply more than two colors.Pencil eyeshadows – they are easy to apply and blend well. Eye shadow and pencil put together will give you easy application and maximum convenience.

How to apply eye shadows:

Step 1:

The first thing you should do is to apply an eye shadow base, concealer or foundation over the eyelid. These products help you keep your eyeshadow in place all day long, provide a base to reveal the eyeshadows’ true color and gives the shadows something to cling onto to prevent slipping.

Step 2:
If you are going to use powder eye shadows apply them with the help of a damp makeup brush. Choose a flat tipped brush to apply the shadows evenly. Brushes work better than the small sponge applicators that come with the cosmetic cases. Blend base color with large brush, for the light colors use smeller brush. Sweep the lightest shade over the entire eyelid from the lash line to the brow line in order to create the smudge resistant base.

Step 3:
After applying the base color and the lightest shade of eyeshadow, apply the second color on the lower lid and blend it into your base color. The color should go over the entire lid and just above the crease. Load the brush and tap off the excess.

Step 4:
If you want to use a third color, apply it along the lash line and the outer corners of your eyes again with damp brush. The third shade must be the darkest. Blend slightly into the medium color, this way you will create depth.

Step 5:
If you want to glamorize your eyes for a night party you should add shimmer to highlight your eyes. Blend away any hard edges to perfect your look.How to choose the right shade of eye shadows:Dark muted colors / brown, olive, plum/ – produce a sophisticated look. These colors are appropriate for those with dark eyes.
Pastel colors /blue, green, peach/ – produce very soft effects. They are appropriate for people with blond hair and blue eyes.
Pale colors / pearl, white/ – have highlighting effect and help make eyes appear biggerSoft colors / gray, beige, sage/ – create a more natural look
Bright colors / blue, green, yellow, violet/ – they are appropriate for those who love to experiment with their look. They must be applied carefully and must be blended well.
Always choose an eye shadow color that matched your skin tone, eye color and face makeup.
Use bright shades to add a subtle hint of color.
Select eyeshadow shades which will accentuate your natural coloring.
Very dark brown eyes can wear almost any color

Tips:
If your eyes look tired you should extend the color from the outer corner of the lid upwards to give them a feline shape.
To lighten dark circles under the eyes, wrap a grated cucumber, potato or banana in a cloth and apply to the eyelids for about 15 minutes.To make your eyes look bigger and more seductive curl your lashes before applying mascara both on the upper and lower lashes.
Use black or navy blue mascara to add definition.
You can use white liner, it really opens up the eye, apply it on the inside corner of the upper and lower lashes. Brush a light shadow from lash line to brow
Always use eyeshadows of good quality – they stay for longer, don’t crease, flake or fade.
Keep your brushes and sponge applicators clean
Always apply an eye shadow base or concealer, this way the shadow will stay in place all day long. If you want to make your eyes appear closer emphasize the inner corners of your eyes.
Always use a brush to apply eye shadow – it will be easier for you to control the application
Never use more than two shades of cream shadows otherwise you would create a grayish mess on your lids.
Always shake any excess powder off the brush before applying it to the lids.
Don’t apply more than three colors of eye shadows – use a light, medium and darker shade.Choose colors that blend easily
Always blend the shadows well – there would be no edge lines from one color to another
Always check that shadow application is balanced on both eyes
Never overdo your lipstick or eye makeup.
Set your eye shadows with loose transparent powder to avoid creasing.
Never apply eye shadow if there is an infection present, if your eyes are watery or if they are feeling sensitive

Choosing And Applying The Right Shades On EyeShadows

Choosing And Applying The Right Shades On EyeShadows

Choosing And Applying The Right Shades On EyeShadowsChoosing And Applying The Right Shades On EyeShadows
Choosing And Applying The Right Shades On EyeShadows

Choosing And Applying The Right Shades On EyeShadowsChoosing And Applying The Right Shades On EyeShadows
Choosing And Applying The Right Shades On EyeShadows
Read more »

Five Common Make Up Mistakes

Makeup Mistake 1. Using a cakey foundation
Don’t choose a cakey foundation – it can be too heavy on your skin. It is true that cakey foundations create a good coverage and hide skin imperfections but sometimes / especially if you are wearing a wrong shade/ they may make your face look unnatural and like a mask.Most of these “cakey foundations” are too thick and if your skin is prone to frequent breakouts, acne or is very oily they can clog your pores. So stay away from cakey foundations. Instead choose a light liquid foundation that is appropriate for your skin type and apply it after the moisturizer with a makeup sponge for an even and flawless application.

Makeup Mistake 2. Using too dark foundation
A foundation should always match your natural skin tone but unfortunately many women choose a foundation that is two or three shades darker than their skin tone and the result is a face that looks comically and unnatural.Most of the women think that a darker shade of a foundation will act like a bronzer and will create a summer tan but for this aim there are those specifically designed products called bronzers.To find the perfect shade of a foundation consult a beauty consultant or ask your beautician. Sample the foundation in natural light and apply a small amount to your cheekbones and jaw line. Feel free to ask for a sample and try it at home over the entire face.

Makeup Mistake 3. Applying too much foundation to hide imperfections
Never use too much of a foundation to hide pimples, scars, small pimples or dark circles under the eyes.For this aim use a concealer – use a light creamy formula that provides good coverage. You can apply the concealer before or after the foundation depending on the result you want to achieve. If you want to conceal a small pimple for example apply it before the foundation, to hide dark circles around the eyes apply a concealer after the foundation application.

Makeup Mistake 4. Not blending your foundation enough
Always blend the foundation well after application. It’s essential , otherwise your face may look like a mask. Start blending at the forehead and slowly spread all over your face, moving in circular motions.Blend onto the jawline and your hair line until the foundation’s lines vanish completely. Blend it with your fingers, makeup sponge or a foundation brush to spread it out evenly. Don’t forget to apply foundation to the neck. Make sure everything blends together and there are no patches.

Makeup Mistake 5. Applying lipstick to chapped lips
Never apply lipstick if your lips are chapped, as it may aggravate the condition. Instead use a lip balm, Vaseline, petroleum jelly to keep your lips moist and soft.If despite all you want to use a lipstick, apply a lip balm before the lipstick to give your lips moisture. Gentle exfoliation with a mild exfoliator and a toothbrush may help you but do it once or twice a week.

Five Common Make Up Mistakes

Five Common Make Up Mistakes

Five Common Make Up MistakesFive Common Make Up Mistakes
Five Common Make Up Mistakes

Five Common Make Up MistakesFive Common Make Up Mistakes
Five Common Make Up Mistakes
Read more »

How To Make Your Own Cranberry Lip Gloss

There’s nothing funner for me than getting a bunch of my girlfriends together and whipping up fast and easy homemade beauty recipes. We do everything from crazy face masks, to nail polishes, to moisturizers, etc. And, since my last “make your own lipgloss” post seemed to generate so much buzz, I though I’d give you guys another yummy lipgloss recipe, and this time it’s delicious cranberry! Here’s how to!

Step 1:
Take 1 tablespoon almond oil, 10 fresh cranberries, 1 teaspoon honey and 1 teaspoon petroleum jelly (optional – for more shine).

Step 2:
Mix together all ingredients and place in a microwave or heat-resistant container. Heat in the microwave or a water bath until the mixture just begins to boil (1-2 minutes in the microwave). Stir well and gently mash the berries. Let sit for 5 minutes.

Step 3:
Strain the mixture through a fine sieve to remove all pieces of cranberry. Stir and allow to cool completely. When cool, spoon into a clean container.

How To Make Your Own Cranberry Lip Gloss

How To Make Your Own Cranberry Lip Gloss

How To Make Your Own Cranberry Lip GlossHow To Make Your Own Cranberry Lip Gloss
How To Make Your Own Cranberry Lip Gloss

How To Make Your Own Cranberry Lip GlossHow To Make Your Own Cranberry Lip Gloss
How To Make Your Own Cranberry Lip Gloss
Read more »

How To Wear Jeggings

With the return of super skinny jeans and leggings this past couple of years, it’s no wonder the Jeggings were invented. Jeggings are basically exremely skinny jeans that look like leggings and are also worn like leggings.

I have to say that in the beginning I was not a fan of the skinny jean or the legging, but as time went on, I came to embrace both, and now, it seems like I can’t even wear any other types of jeans but skinny. The problem with these slim types of bottoms is that they’re hard to dress. And Jeggings especially, can be a little tricky.

A Few Thumb Rules:

First off, make sure Jeggings suit your body type. If you don’t feel comfortable in them, don’t wear them – no one’s going to shun you for it!! Second, pick a dark pair that will go with everything from a basic tank to a sweater dress. Also, black slims you down so that’s always a plus. If you’re on the short side, you may want to get a petite pair as a regular pair of jeggings might run a little too long, and there’s nothing worse than 2 feet of bunched up jeans at the bottom.

So What Exactly Can You Wear Jeggings With?

Jeggings are actually quite versatile, and I feel they do a better job than skinny jeans or leggings would. Because they’re still denim material, you don’t have to cover your butt, but they’re so slim and skin-tight like leggings that you can wear a long sweater or tee, a dress, or just throw a long cardigan over.

I love wearing leggings with a pair of chunky heels, a long sweater and a scarf. Add a big tote to that, and you’re set for the day. So if you’re heading to the mall this week, make sure to pick up a pair of Jeggings: it’s all you’ll need!!!

How To Wear Jeggings

How To Wear Jeggings

How To Wear JeggingsHow To Wear Jeggings
How To Wear Jeggings

How To Wear JeggingsHow To Wear Jeggings
How To Wear Jeggings
Read more »

Summer Makeup Look

With the heat in full swing, you can’t afford to pile on the makeup and have it sweat off your face after just a few hours. That’s why you need to devise a new, fresh, makeup routine that will stay on all day and won’t feel caked on. This quick and easy summer makeup look is one of my favorites and the one I tend to wear most during the summer months.

Step 1: Prep
Prep your skin by starting off with a clean face. Apply a light, oil-free moisturizer and massage it in circular motions. Once the moisturizer has completely melted into the skin, apply a good primer which will ensure your concealer/foundation will stay put. You should also prep your eyes by applying an eye primer onto your lids.

Step 2: Flawless Finish
If you have perfect skin, just use a good tinted moisturizer to get a perfect, flawless finish. If you’re not that lucky though, start off by dotting on concealer wherever needed (red spots, blemishes, and dark circles). Pat the concealer in, making sure the problem area is thoroughly concealed. When it’s hot out, I prefer to skip the foundation as it can be a little too heavy. Instead, I just apply a matte powder all over my face. This will even out discoloration and put the concealer in its place.

Step 3: Beautify

This is where the color comes in. Get a big powder blush and swirl it over your favorite bronzer. Remember, start with little at first as you can always add more later (it’s harder to remove!). First, run the brush along the contour of your face. Then, run the brush over your brow bone, down to the apples of your cheeks, and just right underneath your chin, like a figure 3. Once you’ve achieved your perfect level of bronzing, add a little blush. Pick a peachy pink color that will look natural on you. Using a kabuki brush, just dab the apples your cheeks and blend it in.

Step 4: The Eyes
Your eyes are one of the most important features on your face…it’s one of the first features a person notices on you! So make sure to pay special attention to them, and bring them out more. Lately, I’ve been using Maybelline’s Eyestudio 4 color palette in Give Me Gold. It’s super cheap, it has good staying power, and the colors are actually very pigmented so you don’t have to run the brush over a hundred times. For a simple, refreshing summer look, I take a light hue, such as a sparkly cream or white and apply it all over my lid. Accentuate your brow bone by highlighting in. Just use the same light color and apply it on your brow bone 2-3 times, so that it really stands out. Use a light golden hue for the inner corners of your eyes and a copper, bronze color for your outer corners. Blend it in well. To make your eyes pop, use the light shadow you used earlier and apply it right in the inner corners of your eyes, making sure to get a tiny line on your lower lash. Finish off with a coat or two of mascara.

Step 5: Get a Pretty Pout
Since your eyes aren’t dramatic, you can play around with different lipstick hues. If you’ve been reading my posts, you know I’ve been obsessed with MAC Viva Glam lipstick in GaGa, which is a beautiful pinkish color that works great with this look. But, if you don’t have that exact lipstick, you can use almost anything. Just apply it to your lips and pat the color in to give it that just-kissed look. Finish off with a clear gloss and you’re good to go!

Summer Makeup Look

Summer Makeup Look

Summer Makeup Look

Summer Makeup Look
Read more »

The Maxi Dress For This Summer

Maxi dresses are making a big comeback this summer, and it’s clear since even celebs seem to be loving this flowy, girly trend. Maxi dresses were a big hit two seasons ago, and now they’re making a comeback like never before.So how do you wear a maxi dress and when is an appropriate time to pull one off? Take a cue from the stars who are seen wearing them mostly during the day.

Maxi dresses are the perfect summer staple since they’re light, flowy, and best of all long (so you can skip shaving your legs that day!!!). I love these dresses because they’re so versatile. You can pair them with wedges, sandals, or flip-flops and they’ll still make a big statement. And since they’re so popular this season, you’ll have no problem finding one…or two. When choosing a maxi dress, opt for a colorful, printed pattern as well as an empire waist style to cinch you in for a slimmer effect. So whether you go for a plunging neckline maxi, a strapless one, or a super frilly ruffled maxi dress, the choice is all yours. Take a cue from these celebs and get inspired with your own style!

The Maxi Dress For This Summer

The Maxi Dress For This Summer

The Maxi Dress For This SummerThe Maxi Dress For This Summer
The Maxi Dress For This Summer

The Maxi Dress For This SummerThe Maxi Dress For This Summer
The Maxi Dress For This Summer
Read more »

How To Do A Fishtail Braid

If you love braids as much as I do, you probably know that they aren’t the easiest style to achieve. Sure, a simple three part braid is a walk in the park, but what about other, more complicated styles? Here, I show you how to do a french braid, but the hottest braid style this season is a fishtail braid.

What You’ll Need:


* A comb
* Elastic

Step 1:
Make a low ponytail at the back of your head. Remember that this style works best on medium to long hair that is preferably all one length.

Step 2:
Divide your pony into two equal sections…one for each hand.

Step 3:
Now it’s time to fishtail! You divided your pony into two equal parts. Now, take a small section of one of the parts so you have three parts in your hands.

Step 4:
Take that last section of hair your divided (the smallest one), and cross it over to combine it with the farthest section of hair (not the one you pulled the small section from!). Let go of it – you should now have two sections of hair.

Step 5:
Now pull a small piece of hair from the other half of your hair and cross it over to the other section.

Step 6:
Now continue to go along the length of your hair repeating the above steps of grabbing a little piece from one side and crossing it over to the other side .

Now there are other ways to do a fishtail braids, but this one starting with the pony is the easiest way and is the perfect beginner fishtail. Good luck braiders!

How To Do A Fishtail Braid

How To Do A Fishtail Braid

How To Do A Fishtail BraidHow To Do A Fishtail Braid
How To Do A Fishtail Braid

How To Do A Fishtail BraidHow To Do A Fishtail Braid
How To Do A Fishtail Braid
Read more »

How To Pull Off White Nail Polish

If you’ve been keeping up with the latest trends, you’ve probably seen or heard that white nail polish is making a big splash this summer. Although white nail polish is a pretty pretentious color to pull off, it can look absolutely stunning when worn right. Here are some things to keep in mind before painting your nails white and after.

PREP:

* Start with a set of clean, polished nails. Like I said, white nail polish is extremely pretentious…just like white clothing. If not done right, it can be a complete disaster.
* Pick a crisp, white polish hue in a good brand such as OPI, China Glaze or Essie. The better brands only run about $1-3 more than drug store brands, but they glide on much easier and also last longer.

PAINTING TIME:

* Start with a base coat and let it dry before applying the white polish. This will ensure that it will go on smoothly and not chip so easily.
* White nail polish can be very tricky to apply as it gets streaky, so that’s why it’s so important that you invest in a good one!
* You might need as many as three coats of white polish (I know I did!) since it’s a tricky color and may still look streaky after 3 coats. Again, it depends on which brand you use.
* Finish off white a clear top coat to seal it in!

HOW TO WEAR IT:


* Avoid wearing white nail polish with your little black dress. The contrast is too much, and it just doesn’t look very good.
* DO wear white polish with tanned skin…it looks incredible!
* Pair white nails with colorful pieces such as neon or florals.
* DO wear white polish with other white pieces


How To Pull Off White Nail Polish

How To Pull Off White Nail Polish

How To Pull Off White Nail PolishHow To Pull Off White Nail Polish
How To Pull Off White Nail Polish

How To Pull Off White Nail PolishHow To Pull Off White Nail Polish
How To Pull Off White Nail Polish
Read more »